How to configure Sonar with Azure DevOps
Posted on August 30, 2021
In this article we will explain how to configure SonarQube with Azure DevOps. Here you will learn how to configure, analyze and display the results with SonarQube
Getting started
In this article we will discuss on followings,
- Configure azure DevOps service connection for SonarQube
- Creating project in SonarQube
- Configure SonarQube with DevOps pipeline
Configure azure DevOps service connection for SonarQube
Azure DevOps doesn't have built-in support for SonarQube. So that we need to install the SonarQube extension From Visual Studio Marketplace. Once you install the extension you can continue to adding SonarQube Service Endpoint
-
Select Project settings > Service connections.
-
Select + New service connection, select the SonarQube, and then select Next.
- Enter your SonarQube Server URL, an Authentication Token, and Service connection name. Then, click Save
Generate Authentication Token in SonarQube
- Navigate to SonarQube instance
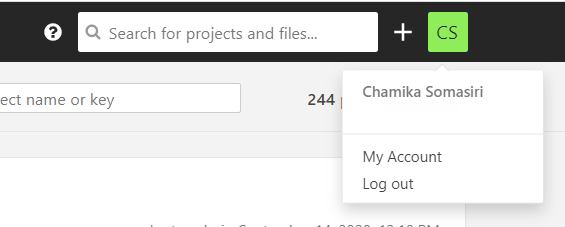
- Click on the user

- Click My Account

- Click Security

- Give a name and click on Generate
Creating project in SonarQube
- Navigate to SonarQube instance
- Click on the + icon next to user profile

- Select Create new project

- Give a project key and remember that for later use
- Give a display name and create the project
Configure SonarQube with DevOps pipeline
- Prepare Analysis Configuration - Configure SonarQube project with the pipeline
- Run Code Analysis - Analyze the source code
- Publish Quality Gate Result - Publish analysis results
Prepare Analysis Configuration
- task: SonarQubePrepare@4
  inputs:
    SonarQube: 'SonarQube Serive connection name'
    scannerMode: 'MSBuild'
    projectKey: '$(SonarProjectKey)'
    projectName: '$(SonarProjectKey)'
    extraProperties: |
      sonar.branch.name=$(Build.SourceBranchName)
      sonar.exclusions=**/*.spec.ts,**/*test.ts
      sonar.cs.opencover.reportsPaths=$(Build.SourcesDirectory)/**/coverage.opencover.xml
- SonarQube is the service connection name which we configured in previous steps.
- projectKey is the project key which we configured in SonarQube project creation
- sonar.branch.name allows you to set the current code branch name. And $(Build.SourceBranchName) is an Azure DevOps built-in variable to get the current branch
- sonar.cs.opencover.reportsPaths is the placeholder for the code coverage report path for C#
Run Code Analysis
- task: SonarQubeAnalyze@4
Since we have configured the required details in the previous step, there is nothing in this step other than just adding the Run Code Analysis task after the build task.
Publish Quality Gate Result
We are almost ready with the code analysis. However lets add One last optional task to publish SonarQube analysis. So that you can configure your build to continue or break based on the analysis results.
- task: SonarQubePublish@4
  inputs:
    pollingTimeoutSec: '300'
Final yaml structure
trigger:
  - master
  - development
  - backlogs/*

variables:
  BuildConfiguration: "Release"

steps:
  - task: SonarQubePrepare@4
    inputs:
      SonarQube: 'ERA Sonar'
      scannerMode: 'MSBuild'
      projectKey: '$(SonarProjectKey)'
      projectName: '$(SonarProjectKey)'
      extraProperties: |
        sonar.branch.name=$(Build.SourceBranchName)
        sonar.exclusions=**/*.spec.ts,**/*test.ts
        sonar.cs.opencover.reportsPaths=$(Build.SourcesDirectory)/**/coverage.opencover.xml
        sonar.test.inclusions=**/*.spec.ts,**/*test.ts

  - task: UseDotNet@2
    displayName: "Install dotnet core"
    inputs:
      packageType: "sdk"
      useGlobalJson: true

  - task: DotNetCoreCLI@2
    displayName: "Restore dotnet packages"
    inputs:
      command: restore
      projects: "**/*.csproj"

  - task: DotNetCoreCLI@2
    displayName: "Build with $(buildConfiguration) configuration"
    inputs:
      projects: "**/*.csproj"
      arguments: "--configuration $(BuildConfiguration)"

  - task: DotNetCoreCLI@2
    displayName: Test dotnet
    inputs:
      command: test
      projects: "**/*Tests/*.csproj"
      arguments: >-
        --configuration $(BuildConfiguration)
        --no-build
        --collect "XPlat Code Coverage"

  - task: PublishCodeCoverageResults@1
    displayName: Publish code coverage
    inputs:
      codeCoverageTool: Cobertura
      summaryFileLocation: $(Build.SourcesDirectory)/TestResults/Coverage/Cobertura.xml
      additionalCodeCoverageFiles: $(Build.SourcesDirectory)/TestResults/Coverage/index.html

  - task: SonarQubeAnalyze@4

  - task: SonarQubePublish@4
    inputs:
      pollingTimeoutSec: '300'

  - task: DotNetCoreCLI@2
    displayName: "Publish"
    inputs:
      command: publish
      arguments: "-c $(BuildConfiguration) -o $(Build.ArtifactStagingDirectory) -r $(TargetRuntimeIdentifier) --self-contained"
      zipAfterPublish: True
      publishWebProjects: False

  - task: PublishBuildArtifacts@1
    displayName: "Publish artifact: drop"
    inputs:
      pathtoPublish: "$(Build.ArtifactStagingDirectory)"
      artifactName: "drop"
      publishLocation: "Container"
Now we are ready with the pipeline changes. And you will see the results in your SonarQube instance and as well as the Quality Gate status in the pipeline
Hope you enjoy the tutorial and see you soon in another very exiting tutorial